Instagram Reels: 7 tips and tricks to get more views
When I first started paying attention to Instagram Reels, I made the same mistake a lot of creators make: I treated views like they were mostly about luck.
One Reel would take off, another would disappear, and it was tempting to blame the algorithm every time. But after looking at what actually gets watched, saved, shared, and replayed, the pattern becomes clearer.
Getting more views on Instagram Reels is not only about posting more. It is about making each Reel easier to understand, easier to watch until the end, and easier for the right people to share.
That does not mean every Reel needs to be overproduced. In most cases, the opposite is true. A simple Reel with a clear idea, a strong first frame, and a useful payoff can outperform a polished video that takes too long to make its point.
This guide is the practical version: what I would check if a creator told me their Reels were not getting enough views.
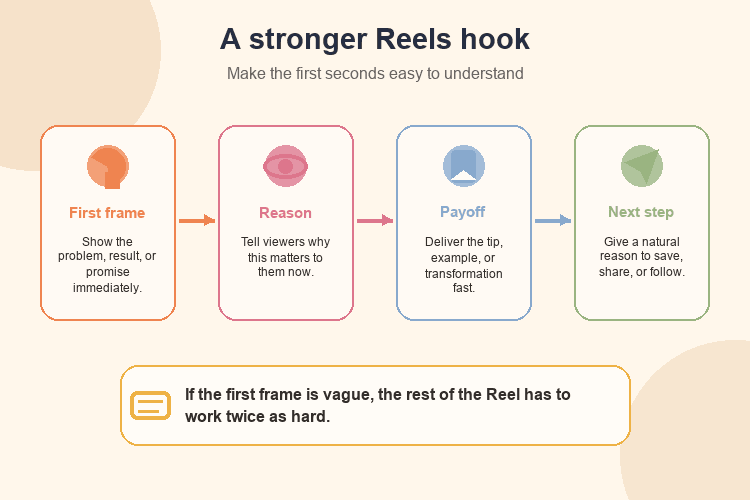
1. Make the first frame instantly clear
The first frame of your Reel does more work than most creators realize.
Before someone reads your caption or understands the full context, they see one thing: the opening visual. If that visual is confusing, slow, or too generic, people keep scrolling before the idea has a chance.
A good first frame tells the viewer what kind of Reel this is.
It might show:
- The final result before the process
- A problem the audience recognizes
- A surprising mistake
- A before-and-after moment
- A clear visual setup
- A text overlay that makes the promise obvious
For example, a creator teaching brand outreach could open with a screenshot-style visual that says, “This pitch got ignored because of one sentence.” A fitness creator could show the finished movement before explaining the form. A beauty creator could show the skin concern or product result before going into the routine.
The point is not to be dramatic. The point is to remove confusion.
If someone needs three seconds just to understand what they are looking at, that is already too long for a cold viewer.
2. Give the Reel one clear promise
A lot of Reels lose views because they try to do too many things at once.
One video wants to be a tutorial, a story, a product review, a personal update, and a trend response all at the same time. The result is usually a Reel that feels busy, but not clear.
A stronger Reel has one promise.
Examples:
- “How to make your brand pitch sound less generic”
- “Three reasons your Reels get views but no follows”
- “The fastest way to improve your Instagram bio before pitching brands”
- “What I would change in this media kit before sending it”
- “A simple lighting setup for filming Reels at home”
The promise does not need to be huge. It just needs to be specific.
Specific promises work because they help the viewer decide quickly whether the Reel is for them. If your audience is creators trying to land brand deals, a vague Reel about “growing online” is easier to ignore than a Reel about why a pitch email gets skipped.
This is also where your niche matters. The more clearly your content speaks to a specific audience, the easier it is for Instagram to understand who may care about it.
3. Use hooks that sound like real problems
Hooks are not just catchy lines. The best hooks sound like something your audience has actually thought, asked, or struggled with.
Weak hooks usually feel broad:
- “Here are some Instagram tips”
- “You need to know this”
- “Social media is changing”
- “Let’s talk about Reels”
Those can work if the creator already has a loyal audience, but they are not very useful for reaching new people.
Stronger hooks are more concrete:
- “If your Reels get views but no followers, check your profile next.”
- “Stop starting your Reels with the setup. Show the result first.”
- “This is why your tutorial feels too slow.”
- “Your caption is not saving a weak first frame.”
- “Here is the difference between a Reel people watch and a Reel people save.”
A useful hook does two things: it names the problem and hints at the payoff.
You can find hook ideas inside comments, DMs, client questions, search suggestions, and analytics. If people keep asking the same thing, that is often a better hook than a random trend phrase.
Instagram also explains Reels as a short-form video format inside its official Reels help documentation, which is useful if you want to understand the format basics before testing creative angles.
4. Keep the pacing tight, but not chaotic
Fast pacing does not mean cutting every half second until the Reel feels stressful.
Good pacing means the video keeps giving the viewer a reason to stay.
That reason can be a new visual, a next step, a useful detail, a pattern break, a clearer example, or a payoff the viewer is waiting for.
A simple way to check pacing is to rewatch your Reel without sound and ask:
- Can I understand what is happening?
- Does the visual change when the idea changes?
- Is there a slow setup that could be removed?
- Does the Reel repeat the same point for too long?
- Is the payoff visible before people lose interest?
For educational Reels, pacing often improves when you cut the introduction and start with the lesson. For story-based Reels, pacing improves when the first line creates curiosity. For product Reels, pacing improves when the product is shown in use instead of being introduced like an ad.
This is where editing helps, but structure matters more than effects.
A Reel with clean cuts and a weak idea will still struggle. A Reel with a strong idea and simple edits can still perform well.
5. Make the Reel worth saving or sharing
Views are useful, but a Reel that gets shared or saved usually has stronger long-term value.
A save tells you the content is useful enough to revisit. A share tells you the viewer thinks someone else should see it. Both signals are important because they show that the Reel did more than fill a few seconds.
If you want more views, build more Reels around ideas people naturally want to keep or send.
Reels worth saving often include:
- Checklists
- Mistakes to avoid
- Step-by-step tutorials
- Before-and-after examples
- Pricing reminders
- Caption formulas
- Content prompts
- Brand pitch examples
Reels worth sharing often include:
- Relatable creator problems
- Clear explanations of confusing topics
- “This is why…” breakdowns
- Opinionated but useful takes
- Simple frameworks people can apply
For example, a Reel about “how to improve your Instagram profile before pitching brands” is more saveable than a vague motivational post. A Reel about “what brands look at before replying to a creator” is more shareable because it gives creators language for something they already feel.
If you are trying to understand whether your Reels drive real engagement, an Instagram engagement rate calculator can help you compare the quality of reactions, not just the view count.
6. Post when your audience is ready to watch
Timing will not save a weak Reel, but it can help a strong Reel get its first push.
If you post when your audience is usually active, you give the Reel a better chance of getting early views, comments, shares, saves, and profile visits. Those early signals can help you understand whether the idea has potential.
The best posting time depends on your audience, timezone, niche, and content format. A student creator may see stronger activity in the evening. A fitness creator may see better engagement early morning or after work. A business creator may perform better during weekday breaks.
Use your own Instagram Insights first. Look for when your followers are active, then test a few posting windows instead of assuming one universal time works for everyone.
A practical testing plan could be:
- Pick three posting windows for two weeks.
- Post similar-quality Reels in each window.
- Compare reach, watch time, saves, shares, and profile visits.
- Keep the windows that create the strongest early signals.
If you want a starting point before testing, a best time to post on Instagram tool can give you a baseline, but your own audience data should guide the final decision.
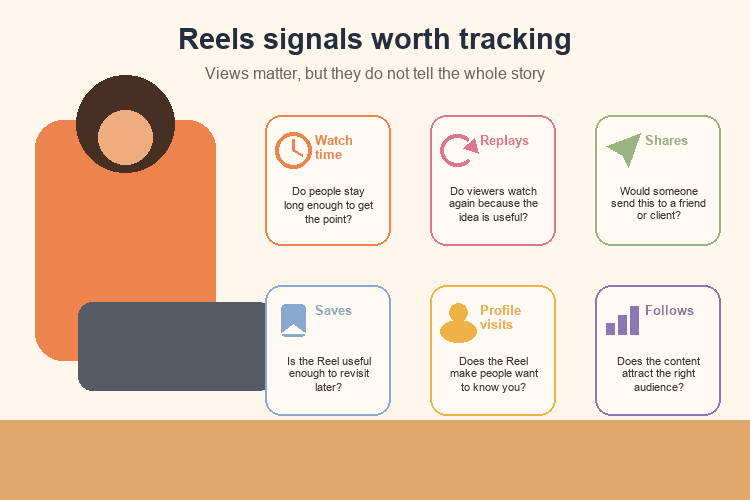
7. Review the right metrics after posting
A Reel with a lot of views is not always your best Reel.
Sometimes a Reel gets reach because the topic is broad, but it brings no followers, no profile visits, and no meaningful engagement. Another Reel may get fewer views but attract the exact audience you want.
That second Reel may be more valuable, especially if you want brand deals, clients, newsletter readers, or a stronger creator business.
After posting, review the metrics based on the goal of the Reel.
If the goal was awareness, look at reach and views. If the goal was education, look at saves and replays. If the goal was community, look at comments and DMs. If the goal was creator business growth, look at profile visits, follows, website clicks, and whether the Reel supports your positioning.
Instagram’s official creator resources are also useful for staying close to platform guidance, but the most useful lessons usually come from your own repeated tests.
A simple review habit helps:
- What was the hook?
- What was the promise?
- Where did people likely drop off?
- Did people save or share it?
- Did it bring the right profile visits?
- What would I test differently next time?
If you want brands to take your creator work seriously, these insights are worth tracking. Your influencer media kit can show your audience, content examples, and performance proof, but the quality of your Reels still comes from the ideas you test every week.
Final thoughts
Getting more views on Instagram Reels is not about guessing what the algorithm wants this week.
It is about making your content easier to understand, easier to finish, and easier to share.
Start with the first frame. Give the Reel one clear promise. Use hooks based on real audience problems. Keep the pacing tight. Make the idea worth saving or sharing. Post when your audience is active. Then review the metrics that match the goal.
The creators who improve fastest are usually not the ones posting randomly. They are the ones who notice what works, learn from what does not, and make the next Reel a little sharper.
Create your media kit with CreatorsJet
Stand out from the competition with a professional media kit created with CreatorsJet. Share all your social media analytics with the click of a button.
🚀 Create your media kit in minutes
✅ Automatically updated
💬 Share with the click of a button
free forever, no credit card required.